EC - Timecards
Timecards Overview
The time card dashboard gives
you instant information, which empowers you to proficiently and successfully
manage your employee time all from one screen.
To view an employee timecard, click on Dashboard, and then click on any
employee from the list.
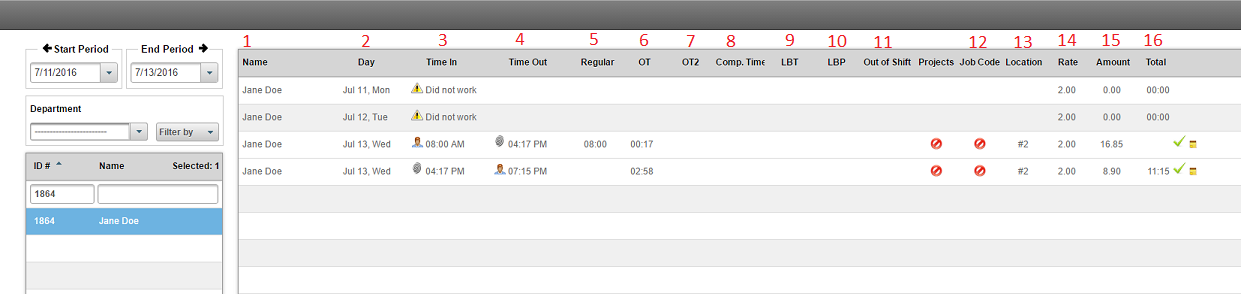
1. Start
& End Period - This is the start and end dates for the pay
period. The date range can be pre-set to weekly, bi-weekly, monthly, or
semi-monthly. When logging into the software, the current pay period will be
displayed. To toggle back and forth between pay periods, simply click on the
left or right arrow. You can also select a specific date range by selecting the
start and end date from the drop-down calendar selection.
2. Departments - By
selecting a specific department, you can filter all the employees associated
with this department on the list.
3. Filter By -
- Employee
type - Regular, Part time, Seasonal, Temporary or Contracted employees.
Contracted employees can be filtered by the contractor name.
- Job
codes - Allows you to filter by specific job names.
- User's
locations - Allows you to filter by the employee's
physical location.
- Time
clock's locations - Allows you to
filter by time clock punch location. For example, a company has 3 locations
A, B, C. Employee 1 belongs to Location A, but from time to time he
works at location B or C. Since the time clocks are linked to a
location, when employee 1 works at location B, you can filter all of
Location B time punches by time clock location.
- Pay periods - By filtering via pay periods, you will be able to see the employees assigned this specific pay period. By default, the software shows the global pay period setting for the company.
4.
Search Boxes - You could search employee by ID or Name by
entering the desired criteria in the search boxes.
5. The
date of the time log.
6. Time
In punches.
7. Time
Out punches.
8. Total
number of regular hours worked for the period selected.
9. Total
number of overtime hours worked for the period selected.
10. Total
number of hours for (LBT) Lunch & Breaks Taken for the period selected.
11. Total
number of hours for (LBP) Lunch & Breaks Paid for the period selected.
12. Total
number of Out of Shift hours.
Out of shift is the time the employee works outside of the assigned schedule.
This feature will only work for employees with assigned schedules.
13. Total
number of hours the employee worked for the day/shift.
15. An
exclamation mark or warning icon means something for that day/shift needs
review. It does not necessarily mean is incorrect.
Customize your Timecards view.
Time cards in Easy Clocking can display different information on each column depending on the settings you enter. By default, the time card displays columns 1-10 from the list below; columns 1 through 6 and 10 cannot be changed. Columns 7, 8, and 9 can be changed with any of the columns listed on 7 – 15.
- Name – Displays the employee name. (Default – Mandatory)
- Day – Displays the date of the time log. (Default – Mandatory)
- Time In – This is the time the employee started working. (Default – Mandatory)
- Time Out – This is the time the employee stopped working. (Default – Mandatory)
- Regular – This is the total of regular hours worked. (Default – Mandatory)
- OT / Overtime – This is the total of overtime hours worked. (Default – Mandatory)
- Double Time/OT2 – This is the total number of double time hours worked. (Editable)
- Comp. Time – This is the total number of hours of compensatory time calculated. (Editable)
- LBT – Stands for Lunch Break Taken. This is the total of lunch and breaks taken by the employee. (Default – Editable)
- LBP – Stands for Lunch Break Paid. This is the total amount of lunch and/or breaks to be paid to the employee. (Default – Editable)
- Out Of Shift – This is the total time the employee recorded outside his schedule assigned. (Default – Editable) Example: If an employee has been assigned a schedule from 8am to 5pm, and the employee clocks in at 7:50am, then the out of shift column will display 10 minutes.
- Job Codes – This column defines a number associated to a specific job or task. When using job codes, employees must enter a number on the time clock prior to record the time in and time out. Such number is associated to the job and will display on this column. (Default – Editable)
- Location – This column will show which location the employee clocked in from. (Editable)
- Rate – Here the employee hourly rate will be displayed. The rate displayed here can either be the User’s pay rate or the pay rate associated with a job code. (Editable)
- Amount – The amount will be displayed in monetary amount what is to be paid to the employee based on the total number of hours and the pay rate. (Editable)
- Total – This is the total number of worked hours recorded on each day. (Default – Mandatory)
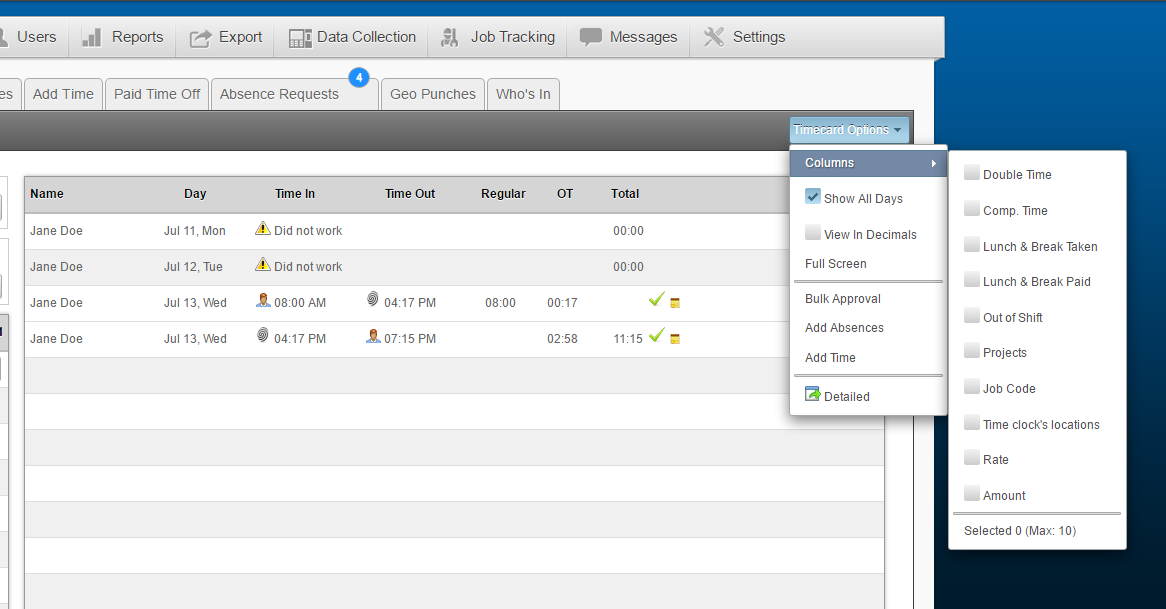
How to change columns 7-15:
- Click on Time Card Options towards the top right and click on Columns.
- Check mark the options that you would like to see displayed as columns on the time cards.
- Clicking outside the boxes will save your settings automatically.
Easy Clocking Support Team Contact Details
Related Articles
EC - Creating Software Administrators
Creating Administrators/Managers To create an Administrator, navigate to: Settings Administrators Select Create Administrator A window will appear where you will be prompted to fill in the following information: First Name Initial Last Name Email ...EC - Missing Punch
To add time from a missing punch, do the following: Click on Dashboard, then click on the Timecards. Click one or more Users from the list to view their time logs (To select more than one user, hold the Ctrl key as you click all the users you wish to ...EC - Manage Archive Data
Easy Clocking software automatically archives data older than six months from the current date. Once archived, this data is no longer accessible directly via Timecards, Reports, or Exports. You can unarchive data from the past six months via the ...EC - Implementing Absences
To create absences from Schedules: Select Dashboard or Users (the absence can be created from either tab - it is the same calendar) Select Schedules Select one or more employees from the list Select the Schedule Options in right hand corner and ...EC - Paid Time Off
Paid time off or personal time off (PTO) is a policy that provides a bank of hours in which the employer pools sick days, vacation days, and personal days that allows employees to use as the need or desire arises. This will apply specifically to ...