Xenio F500/F1000 Device Installation
We suggest that a qualified tradesperson install and mount the device, ensuring the below guide is followed.
Installation Guide Note: Determining the location and positioning of the installation
- Avoid installing the device in locations that has contact with strong light source or outdoors. e.g., direct sunlight, spotlight, fluorescent light.
- The device should be at least 2 metres away from any light source such as a ceiling fluorescent light.
- Avoid installing the device in locations prone to heat, high moisture, or condensation levels in the air. This includes portables, sheds and areas where there is not sufficient cooling.
- Suggested minimum installation height of the device from the ground is 1.4 metres.
- Note: Supplied original power adaptor MUST be used and cannot be modified with the device. If the device is hardwired or another power adaptor is used, the warranty on the device will be void.
- You MUST plug in the supplied power adaptor in a power point socket, rather than a power board to avoid any potential power fluctuations and possible damage to your device. This will void the warranty of the device.
- Warranty is void on devices if they are found to be used on power generators. Voltage fluctuations degrade the performance of the equipment and cause instability of the internal voltages and currents of the electronic equipment. Power fluctuations can corrupt and even physically damage the sensitive internal circuits.
Wall Mount Bracket Installation
1. Drill holes on the wall or other surface according to the mounting plate.
2. Use four supplied self-tapping screws to secure the mounting plate on the wall.
3. Route the cables through the cable hole of the mounting plate and bracket and connect to the wiring terminals.
(Refer below for cable connection)
4. Plug the wiring terminals into the device and use four supplied screws to secure the bracket on the device.
5. Align the device with the mounting plate and buckle them together and use the two supplied M3 screws (not shown in what’s in the box) to secure the device on the mounting plate.
6. Adjust the tilt angle of the device according to your actual needs.
Connecting the cable to the back of the device
Power and Network Jack Cable
Power and Ethernet/Network cable end ---> 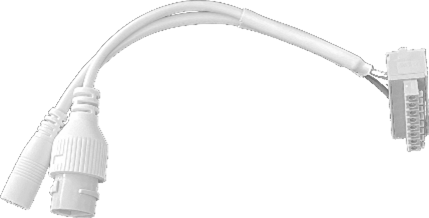 <--- Power/Network socket end that plugs into the back of the device
Please ensure you plug in the power/network socket into the below ports in the back of the device, as shown in red.
Back of device
Once the jack cable socket is firmly connected into the socket on the back of the device, plug in the power adaptor into the jack. Ensure the power point is within 1 metre of the device.
If you are using Wi-Fi to connect the device you will not need to connect the network cable.
If you are connecting via a network cable, plug in the cable and connect it to an Ethernet wall socket, router, or switch.
Easy Clocking Support Team Contact Details
Related Articles
Xenio - Device Installation
Note: Installation instructions are for a Xenio 50, 200 & 500 device. If you have a Xenio F500/F1000, please refer to this article. If you have a Xenio i1000, please refer to this article. We suggest that a qualified tradesperson install and mount ...Xenio i1000 - Device Installation
- We suggest that a qualified tradesperson install and mount the device, ensuring the below guide is followed. Installation Guide Note: Determining the location and positioning of the installation Avoid installing the device in locations that have ...Xenio Device Manuals
Links for User Manuals of the Xenio devices that you have purchased: Xenio 50 User Manual Xenio 200 User Manual Xenio 500 User Manual Xenio 700 User Manual Xenio i1000 User Manual Xenio F500 Manual & Xenio F1000 ManualEC - Device Installation
EC - Assigning Administrator/Manager Level for the Xenio Device
The Xenio smart clock’s default setting allows anyone open access into the Menu. To restrict access, user levels can be specified as Administrator or Manager. Setting these restrictions will only allow authorised users to open the device Menu. Level ...