EC - Clocking Permissions
Managers and Administrators can assign the users to specific devices via the Clocking Permissions tab. The Clocking Permissions tab is where you can give the employee access to clock in via a PC, Mobile Application or the Time Clock.
To setup Clocking Permissions for an employee, navigate to:
- Users
- Clocking Permissions
- Select the employee
- Clocking Permission settings:
- Clock in by PC
- Allow only Authorised IP: Only IP address from the authorised list are accepted.
- Allow all OR Flag unauthorised: Allow all IP address, or flag IP addresses outside of an authorised list.
- Only USB reader: Allow Clocking In/Out from USB fingerprint reader.
- Use Mobile: Gives access to the Mobile Application
- Mobile Time clock: Gives access to Clocking In/Out via the Mobile Application
- Job Required: Job selection required when Clocking In/Out of the Mobile Application
- Disable Auto-login: Disabling auto-login to the Mobile Application. This option is always enabled by default.
- Picture Required for Mobile Time clock: Photo ID required when Clocking In/Out of the Mobile Application
- Use Mobile device Time: If users are travelling/clocking in or out across time-zones, the system will automatically pull the device time instead of using the employee's home location time-zone.
- Use a Geo-location: An assigned radius where an employee can clock in/out from. Outside of the radius, the employee cannot clock in or out.
- Allowed only from Mobile IMEI or ID: Deselect this option to allow simultaneous Mobile access from any IMEI. Otherwise, it is selected by default and users will only be able to log into one IMEI (device) at a time.
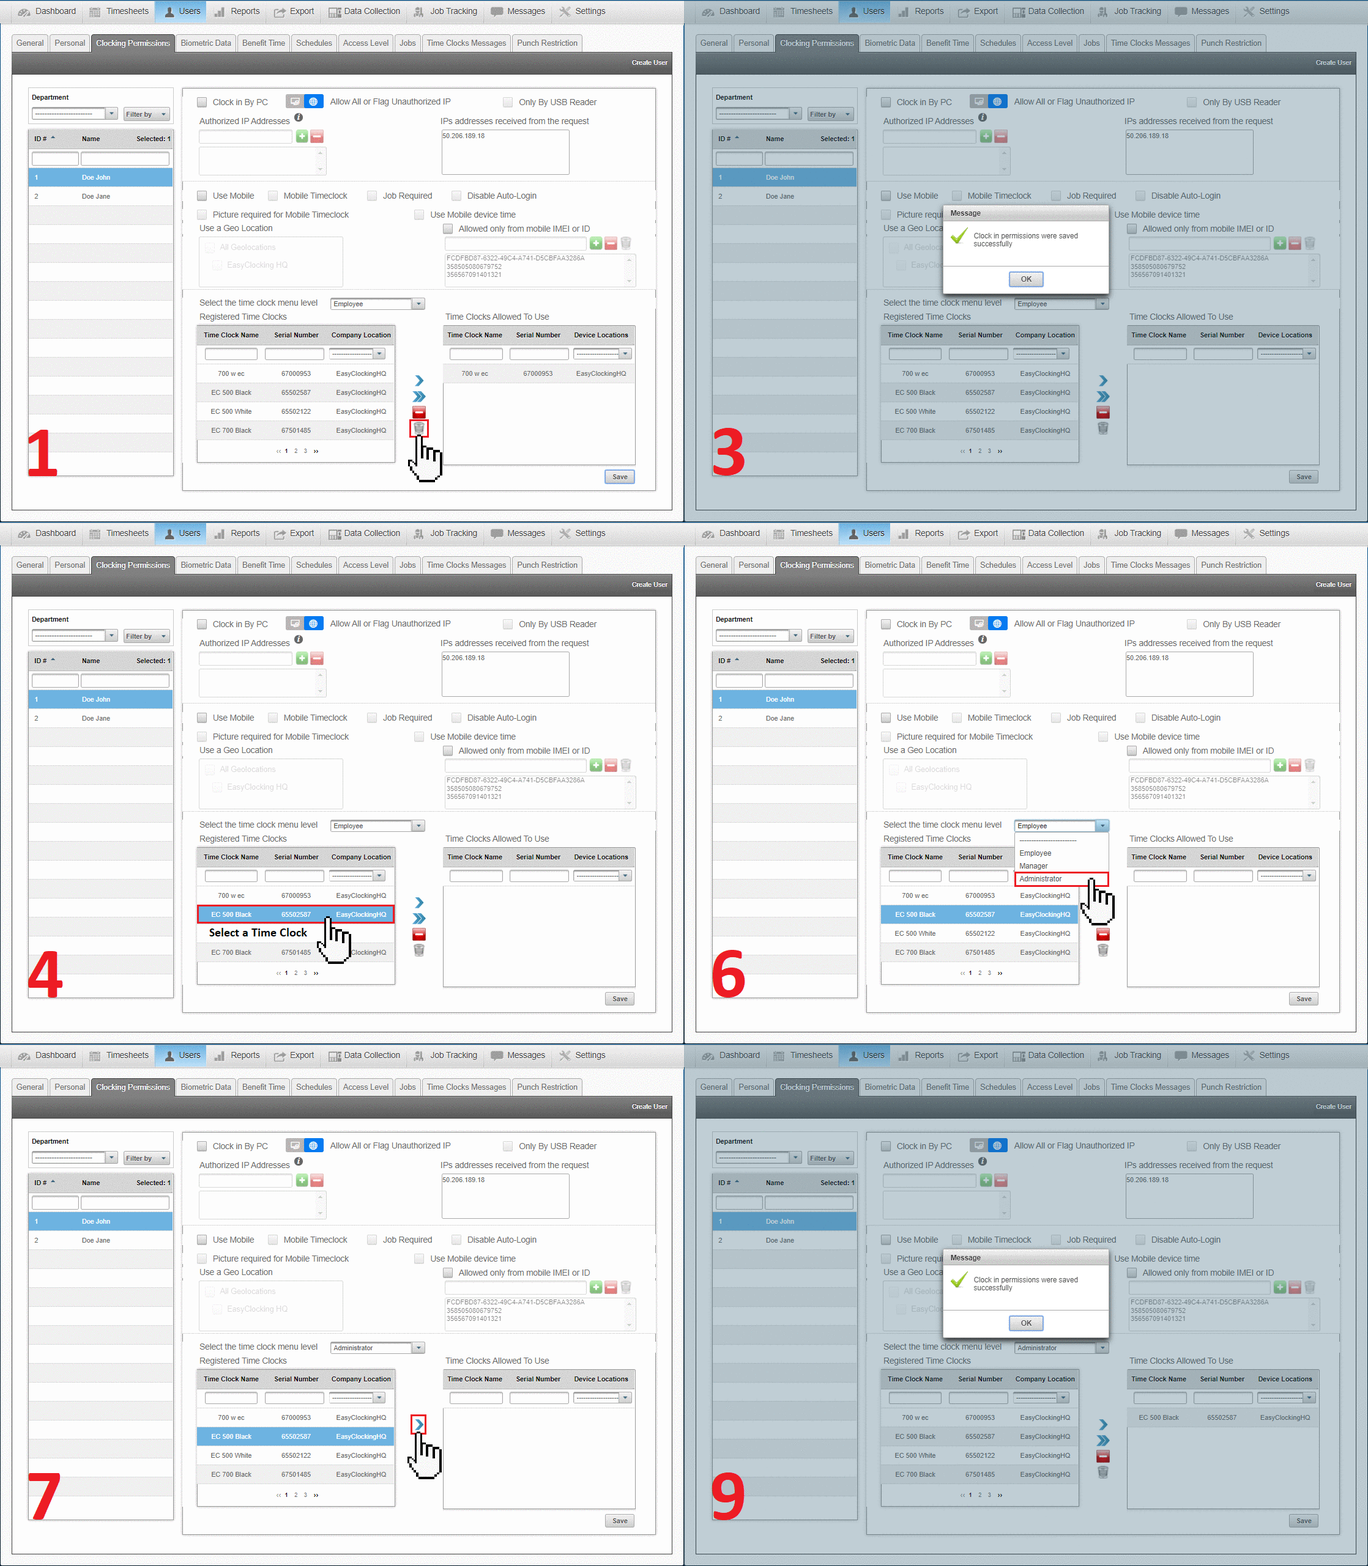
- Select the Time Clock menu level: Choose from Employee, Manager or Administrator. Please note: Please leave as employee until you have registered the employee that will be the Manager/Administrator of the device with their fingerprints/proximity card. Once that has been done you can go back and assign Manager/Administrator level to that employee, see Figure B.
- Employee: Cannot access the Time clock menu.
- Manager: Can access parts of the Time clock menu, unless otherwise allowed.
- Administrator: Full access to menu.
- Registered Time Clocks: Devices that are registered to your account.
- Time clocks allowed to use: Devices that the employee is allowed to clock in/out from.
- Clock in by PC
Figure A
Change a user from Employee status to Administrator status on a time clock:
- Remove clocking permissions and save.
- Re-send user to the time clock as an admin
Figure B

Please note: If you are replacing an old device (time clock) and wish to remove the device (time clock) completely from the software you will need to remove all clocking permission from that device (time clock).
- Go to each User/Employee that has been given clocking permissions for the old device (time clock).
- Select the old device (time clock) under Time Clocks Allowed to Use, click the rubbish bin which will remove the device and then SAVE.
- Once you have removed clocking permissions for that device (time clock) from all users/employees you will be able to remove device (time clock) from the software.
- Go to Data Collection - Time Clocks - Make sure you select the OLD device (time clock) that is offline - click the Trash Button - the device (time clock) will be deleted.
Easy Clocking Support Team Contact Details
Related Articles
EC - User listed in software but not showing on device / Send user information to device.
If you have added a user into the cloud software but you cannot see them on the clocking device the first step is to check that the user has been assigned the correct permission to allow them to clock in/out on the device. The Clocking Permissions ...EC - Reports-Time Clocks
Confirm the menu-level for different users, or review the clocking permissions for each employee with our Time Clock reports. Time Clock Admin Level: A report that tells you the role of each user on the time clock, whether the user is an Employee, ...EC - Enrolling Fingerprints
Prior to register the employee fingerprint at the time clock, you must enrol the employee profile information in the software first, secondly you must create the employee clocking permission . When adding the employee in the software, you will be ...EC - Enrolling Pin
Prior to the employee being able to use pin number at the time clock, you must enrol the employee profile information in the software first, secondly you must create the employee clocking permission . When adding the employee in the software, you ...EC - Access Level
You can give your employees different Access Levels according to their privileges. There are three account levels in Easy Clocking: Employee: Can view/review their own time card. Cannot make edits. Manager: Can be given specific permissions to review ...